Yolov5
Yolov5 is a family of object detection architectures and models pretrained on the COCO dataset, and represents Ultralytics open-source research into future vision AI methods. Later releases also added support for instance segmentation. Custom docker images with additional tools are available from here:
https://github.com/waikato-datamining/pytorch/tree/master/yolov5
Prerequisites#
Make sure you have the directory structure created as outlined in the Prerequisites.
Data#
In this example, we will use the Oxford Pets dataset, which consists of 37 different categories of cats and dogs.
Download the dataset from the following URL into the data directory and extract it:
https://datasets.cms.waikato.ac.nz/ufdl/data/oxford-pets/oxford-pets-adams.zip
Rename the adams directory to pets-adams.
To speed up training, we only use two labels: cat:abyssinian and dog:yorkshire_terrier.
The label filtering and splitting it into train, validation and test subsets is done
using image-dataset-converter:
docker run --rm -u $(id -u):$(id -g) \
  -v `pwd`:/workspace \
  -t waikatodatamining/image-dataset-converter:0.0.4 \
  idc-convert \
    -l INFO \
    from-adams-od \
      -i "/workspace/data/pets-adams/*.report" \
    filter-labels \
      --labels cat:abyssinian dog:yorkshire_terrier \
    discard-negatives \
    coerce-mask \
    to-yolo-od \
      -o /workspace/data/pets-yolo-split \
      --labels /workspace/data/pets-yolo-split/labels.txt \
      --labels_csv /workspace/data/pets-yolo-split/labels.csv \
      --use_polygon_format \
      --split_names train val test \
      --split_ratios 70 15 15
Finally, download the dataset.yaml file and place it in the pets-yolo-split
directory. It contains information about the dataset directory, the splits and the class labels.
Since the labels can come out in a random order, you need to update the labels in the yaml file
with the ones that got output in the labels.txt file. You can automatically quote the
comma-separated list using the following command:
Training#
For training, we will use the following docker image:
If you do not have a GPU, you can use the CPU-only image:
The training script is called yolov5_train, for which we can invoke the help screen as follows:
Instead of using config files, we can just tweak parameters via command-line options.
However, we still need to download a base model to use for training. Yolov5 offers different
models, which differ in speed and accuracy. We will use the medium one called yolov5m-seg.pt
from the v6.2 release:
https://github.com/ultralytics/yolov5/releases/download/v6.2/yolov5m-seg.pt
Download it and place it in the models directory.
It is good practice creating a separate sub-directory for each training run, with a directory name that hints at
what dataset and model were used. So for our first training run, which will use mainly default parameters, we will
create the following directory in the output folder:
Since the image size should be a multiple of 32, we use 416 for this experiment.
Download the yolov5m-seg.yaml parameter file into the output/pets-yolov5 folder:
https://github.com/ultralytics/yolov5/blob/master/models/segment/yolov5m-seg.yaml
Once downloaded, change the number of classes (nc) to 2.
Kick off the training with the following command:
docker run --rm \
  -u $(id -u):$(id -g) \
  --shm-size 8G \
  --gpus=all \
  -v `pwd`:/workspace \
  -t waikatodatamining/pytorch-yolov5:2022-11-05_cuda11.1 \
  yolov5seg_train \
  --img 640 \
  --workers 1 \
  --device 0 \
  --batch 16 \
  --epochs 10 \
  --cfg /workspace/output/pets-yolov5/yolov5m-seg.yaml \
  --data /workspace/data/pets-yolo-split/dataset.yaml \
  --weights /workspace/models/yolov5m-seg.pt \
  --project /workspace/output/ \
  --name pets-yolov5 \
  --exist-ok
Predicting#
Using the yolov5_predict_poll script, we can batch-process images placed in the predictions/in directory
as follows (e.g., from our test subset):
docker run --rm \
  -u $(id -u):$(id -g) \
  --gpus=all \
  -v `pwd`:/workspace \
  -t waikatodatamining/pytorch-yolov5:2022-11-05_cuda11.1 \
  yolov5seg_predict_poll \
  --model /workspace/output/pets-yolov5/weights/best.pt \
  --data /workspace/data/pets-yolo-split/dataset.yaml \
  --image_size 416 \
  --prediction_in /workspace/predictions/in \
  --prediction_out /workspace/predictions/out
Notes
-
By default, the predictions get output in ROI CSV format. But you can also output them in the OPEX JSON format by adding
--prediction_format opex --prediction_suffix .jsonto the command. -
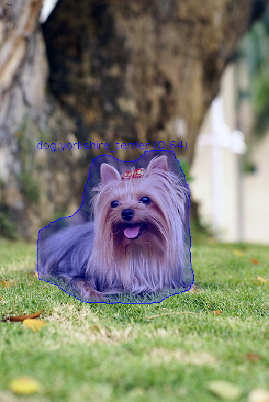
You can view the predictions with the ADAMS Preview browser:
Example prediction

Troubleshooting#
- If you are re-using a dataset that was used by another YolovX framework, you
may get strange error messages when reading the data. This can be due to
incompatible cache files that get generated to speed up loading the data.
Make sure to remove all files in the
labelsdirectory that have a.cacheextension.